Understanding the User Interface
The application uses a simple and consistent approach for
navigating and maintaining your property management information.
Page Structure
Each of the main web pages has a standard structure as follows:
- At the top of the page is the main navigation menu,
containing links for each of the main pages of the application.
- On the left-hand side of the page are the action links
relevant to the current web page.
- The remainder of the page contains the appropriate content
for the current feature.
Navigating Information
After logging in you will normally land in the main home page.
From there you can use the following methods for navigating your
information:
- Use the links within the main navigation menu at the top of
the page for accessing the main areas of the application.
- Most pages will display tables of data, within which will
be rows describing items of information relevant to your business.
Where appropriate, navigation links will be available within these rows
for quickly and easily navigating to related information. So, for
example, the Tenancies section of the home page contains one row
per open tenancy and on each of these rows the name of the tenancy can
be clicked to go to its full tenancy balance.
Navigating Tabular Information
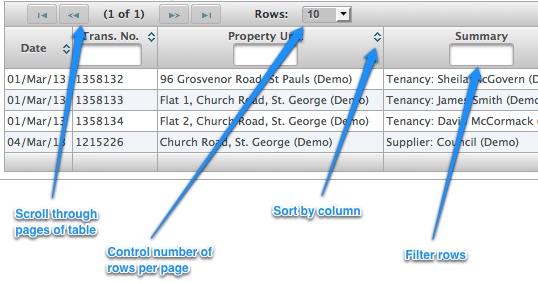
The following screenshot shows an example table:

Many of the tables contain additional functions for filtering and
sorting their content as demonstrated in the above screenshot. This
includes:
-
Filtering is achieved by changing drop-down lists situated above the
table or by typing search strings into text boxes within the column
headings.
-
Sorting is achieved by clicking on column headings. Each time you click a
column heading it changes the sort order from ascending to descending
and back again.
- Scrolling through pages of the table is achieved using the paginator control above the column headings.
- Changing the number of rows displayed in each page is achieved with the 'Rows:' selector to the right of the paginator control.
Managing Information
Managing and changing information is typically achieved
through a combination of action links on the left-hand side of the page
and also icon links next to individual items or sections. Clicking on
these action links will launch a dialog that typically manages the
desired action. For example, clicking on a link to edit an income
record will present a dialog displaying details of the income record
and allowing you to change their values before saving.
The standard set of icon links are as follows:
| Icon |
Description |
|
Record a new item. Clicking on the icon will display a
dialog for the new item in question. Wherever possible field values
will be defaulted automatically. |
|
Edit an existing item. Clicking on the icon will
display a dialog for editing an existing item. |
|
Delete an existing item. Clicking on the icon will
display a dialog for deleting an existing item. The dialog will display
the properties of the item, giving you an opportunity to review them
before confirming deletion. The dialog will also provide the ability to
cancel the operation if you decide you don't really want to delete the
item. |
|
Display a date-picker. Used in dialogs for entering or
changing date fields. |
Hovering the mouse cursor over an icon link will display a
brief description of the icon's function.
Dialog Windows
As mentioned above, clicking on action links will usually
launch dialog windows that represent all the information for a specific
record. Most dialog windows have a standard set of buttons and links
available to them:
Button or Link
|
Description |
|
Attachments
|
Access the attachments for
the object in context. Attachments can be stored against most key
record types (e.g. property units, tenancies, expenditure, etc.) For
further details see the attachments
help topic. |
|
Help
|
Display the help topic for the current dialog.
|
|
Save the information when
recording a new record.
|
|
Save the information when
editing an existing record.
|
|
Cancels the dialog,
discarding any changes made within it.
|
Keyboard Shortcuts
The following keyboard shortcuts can be used:
Shortcut
|
Command |
CTRL+SHIFT+E
|
Launches the Create Expenditure dialog. Applicable in all pages where there is a Create Expenditure link.
|
| CTRL+SHIFT+I |
Launches the Create Income dialog. Applicable in all pages where there is a Create Income link.
|
| CTRL+SHIFT+S |
Saves the currently open dialog. Applicable whenever there is a dialog window open.
|
| CTRL+SHIFT+X |
Cancels the currently open dialog. Applicable whenever there is a dialog window open. |
Date Fields
You can either use the date picker to enter dates or you can type in dates in one of the following example formats:
23/Feb/09
23/Feb/2009
23/02/09
23/02/2009
230209
23022009
|
